Now let’s add routing to our project.
For this we will use lit-element-router
Type npm install lit-element-router in console
Now let’s start restructuring our project
We will separate pages and components for better understanding
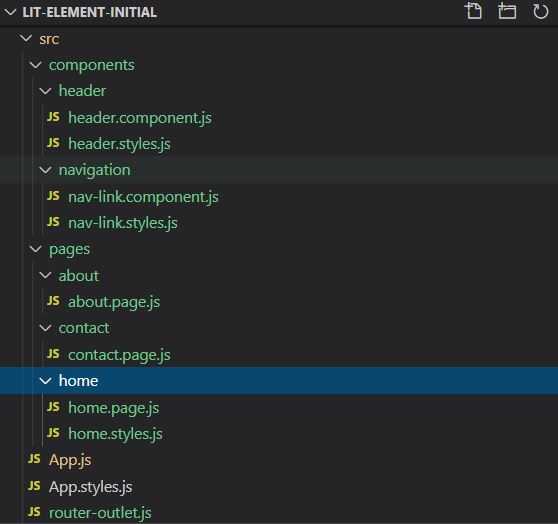
Create Project files as given in following image:

Now replace code of App.js file with code given below
import { LitElement, html } from "lit-element";
import { router } from "lit-element-router";

//Components
import "./components/navigation/nav-link.component";
import "./components/header/header.component";
import "./router-outlet";

//pages
import "./pages/home/home.page";
import "./pages/contact/contact.page";
import "./pages/about/about.page";

class App extends router(LitElement) {
  static get properties() {
    return {
      route: { type: String },
      params: { type: Object },
      query: { type: Object },
    };
  }

  static get routes() {
    return [
      {
        name: "home",
        pattern: "",
        data: { title: "Home" },
      },
      {
        name: "about",
        pattern: "about",
      },
      {
        name: "contact",
        pattern: "contact",
      },
      {
        name: "not-found",
        pattern: "*",
      },
    ];
  }

  constructor() {
    super();
    this.route = "";
    this.params = {};
    this.query = {};
  }

  router(route, params, query, data) {
    this.route = route;
    this.params = params;
    this.query = query;
  }

  render() {
    return html`
      <app-header></app-header>
      <nav-link href="/">Home</nav-link>
      <nav-link href="/contact">Contact</nav-link>
      <nav-link href="/about">About</nav-link>

      <router-outlet active-route=${this.route}>
        <home-page route="home"></home-page>
        <about-page route="about"></about-page>
        <contact-page route="contact"></contact-page>
        <h1 route="not-found">Not Found</h1>
      </router-outlet>
    `;
  }
}

customElements.define("app-container", App);
Now add below code to router-outlet.js file
import { LitElement, html } from "lit-element";
import { outlet } from "lit-element-router";

class RouterOutlet extends outlet(LitElement) {
  render() {
    return html` <slot></slot> `;
  }
}

customElements.define("router-outlet", RouterOutlet);
Router outlet will act as a container for the page to which we will switch.
Slot is used to render the children of the element. A children is something written between opening and closing tag of element.
Now add following code to nav-link.component.js
import { LitElement, html } from "lit-element";
import { navigator } from "lit-element-router";

class NavLink extends navigator(LitElement) {
  static get properties() {
    return {
      href: { type: String },
    };
  }
  constructor() {
    super();
    this.href = "";
  }
  render() {
    return html`
      <a href="${this.href}" @click="${this.handleClick}">
        <slot></slot>
      </a>
    `;
  }
  handleClick(e) {
    e.preventDefault();
    this.navigate(this.href);
  }
}

customElements.define("nav-link", NavLink);
Let’s add some basic styling to our nav-bar
Wrap nav-links in App.js in div with class nav-container
<div class="nav-container">
    <nav-link href="/">Home</nav-link>
    <nav-link href="/contact">Contact</nav-link>
    <nav-link href="/about">About</nav-link>
</div>
Add styling to App.styles.js
.nav-container {
    display: flex;
    justify-content: space-evenly;
}
Import styles to App.js and add to return array of styles()
Add following code to nav-link.styles.js
import { css } from "lit-element";
export const NavLinkStyles = css`
  .nav-link {
    text-decoration: none;
    border: solid 2px black;
    color: black;
    padding: 5px;
    margin-right: 5px;
    border-radius: 5px;
    display: inline-block;
    text-align: center;
  }
  slot {
    font-weight: bold;
  }
  .nav-link:hover {
    color: #ffffff;
    background-color: #000000;
  }
`;
Import styles to nav-link.js and add to styles()
Add nav-link class to <a> tag
<a class="nav-link" href="${this.href}" @click="${this.handleClick}">
    <slot></slot>
</a>
Wolaaa! We have a beautiful Nav Bar now.
Now let’s add some code to pages.
Add some placeholder code to all pages
about.page.js
import { LitElement, css, html } from "lit-element";

class About extends LitElement {
  static get styles() {
    return [css``];
  }
  render() {
    return html` <div>
      <h1>This is About Page</h1>
    </div>`;
  }
  static get properties() {
    return {
      eg: {
        type: String,
      },
    };
  }
  constructor() {
    super();
  }
}
customElements.define("about-page", About);
contact.page.js
import { LitElement, css, html } from "lit-element";

class Contact extends LitElement {
  static get styles() {
    return [css``];
  }

  render() {
    return html` <div>
      <h1>This is Contact Page</h1>
    </div>`;
  }

  static get properties() {
    return {
      eg: {
        type: String,
      },
    };
  }
  constructor() {
    super();
  }
}

customElements.define("contact-page", Contact);
home.page.js
import { LitElement, css, html } from "lit-element";

class Home extends LitElement {
  static get styles() {
    return [css``];
  }

  render() {
    return html` <div>
      <h1>This is Home Page</h1>
    </div>`;
  }

  static get properties() {
    return {
      eg: {
        type: String,
      },
    };
  }
  constructor() {
    super();
  }
}

customElements.define("home-page", Home);
Now spin up the server by typing npm start in console
And try to switch pages by clicking on nav links.
You will notice that as you switch between pages, Url in browser address bar also change.
The is handled by lit-element-router.
Now go to a specific route other then ”/” and refresh the page
You will get Cannot GET /contact in browse.
This is because these routes are generated within our app dynamically and they don’t exist till our app loads.
But Since we refreshed the page webpack-dev-server will try to find index.html in route that don’t exist and we will get this error.
To fix the we will add a property to dev config file
devServer: {
    historyApiFallback: true,
  },
Restart the Server. Now you will see the app will work as intended.
Now whenever webpack detects that given address does not match to any file, it will simply serve the base index file and after that internal router will routes to page specified in URL.
